In this article there’s Firefox Containers, Docker Containers, and Tupperware Containers. I’ll do my best to make the distinction obvious.
I use NextDNS extensively, and have my entire home network behind it. Outbound DNS requests are blocked at the gateway level, and my router uses DNS over HTTPS to query NextDNS for resolution.
This is generally a terrific experience, meaning devices of mine that don’t support running the NextDNS client natively still get the protections of NextDNS, as do guests.
Additionally, I use Firefox Multi-Account Containers. Containers allow me to be logged into two AWS accounts, Office 365 accounts, and other services simultaneously. In conjunction with two other add-ons; Temporary Containers and Open external links in a container, I have a really nicely tuned browsing setup.
In my day job, I’m occasionally required to access sites and services that I’d prefer NextDNS block in my everyday internet adventures. I’m talking analytics and monitoring services that many corporate systems utilise legimately, but some websites use less legitimately. Allowing them through my NextDNS configuration is problematic because it means all my devices and browser sessions can then access those services.
Firefox Containers support configuring a proxy server on the per-container level, so any tabs opened in that container will use the configured proxy server. With a combination of Docker, NextDNS, and Firefox Containers, we can very easily run a proxy server in a container that allows tabs in a specific container to browse the internet with a different DNS server (or in my case, a different NextDNS profile).
The Process
- Install Mozilla Firefox
- Install the Firefox Multi-Account Containers add-on
- Install Docker on your computer. This article won’t go into the details of Docker because…there’s a bit to it. If you’re not comfortable with Docker, maybe go get comfortable with that first
- Clone down this GitHub repository: hinata/nginx-forward-proxy
- Optional: If you plan to use NextDNS for your bypass resolver:
- Open the NextDNS console and create a new profile called “Bypass” or something similar. Turn off all the features you don’t want enabled
- In the
nginx-forward-proxyrepository, opennginx.confand update line 16 to change the default resolver from Cloudflare’s 1.1.1.1 to your new NextDNS profile’s resolvers. You could conceivably update this to accept resolver IPs via-eenvironment variables, but that’s beyond the scope of this article
- Build the image:
docker build -t nginx-forward-proxy . - Run the Docker container:
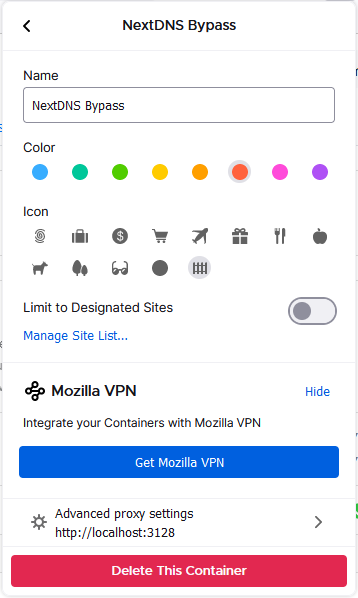
docker run -p 3128:3128 nginx-forward-proxy - Create a new container in Firefox. Choose Advanced Proxy Settings and set the proxy server to
http://localhost:3128to direct traffic to the proxy Docker container. The container should look like this once configured:
That’s it! If you open a site in the NextDNS Bypass Firefox Container, it will go via the Bypass NextDNS profile (or whatever resolver you set). This process should also work for those of you using Pi-hole, AdGuard, or any other custom resolver.
Comments/questions
There's no commenting functionality here. If you'd like to comment, please either mention me (@[email protected]) on Mastodon or email me. I don't have any logging or analytics running on this website, so if you found something useful or interesting it would mean a lot to hear from you.